


Gingersnap Pumpkin Pie Bars
*This post was created in collaboration with Arctic Zone. All words, images, and opinions are my own.
As soon as the temperature starts to drop, and the leaves begin to change color you know it’s pie season! Probably the coziest of all desserts, this treat is one of my favorites to bake, decorate, and of course, eat :). You can’t have Thanksgiving without pie, but after a full day of turkey prep, and ALL the sides, baking a pie might feel like the last thing you want to do. So, this year I’m turning my grandma’s pumpkin pie recipe into bars complete with a cookie crust. The crust bakes up super-fast, there’s no chance of a soggy bottom haha, and if you choose, you can completely skip the rolled-out pie crust. Baking it in a 9×13” pan allows for 2 pies worth of filling to be baked at once, making it the perfect dessert for a hungry crowd! It’s also easy to cut the bars into smaller squares for friends and family who have filled up on dinner.
Cool, creamy and oh so delicious, these pumpkin pie bars have all the traditional pumpkin pie flavor with an extra kick of spice and a bit of added warmth from the gingersnap crust. The 9 X 13” pan makes it super simple to transport the pie to your holiday gatherings with a thermal carrier like Arctic Zone’s which is BPA, PVC, lead, and Phthalate free. This Food Pro Thermal Carrier even comes with a trivet that allows you to take the pie right from the oven, or the fridge, to the carrier! You can use code LUXE15 for 15% off all Arctic Zone products.
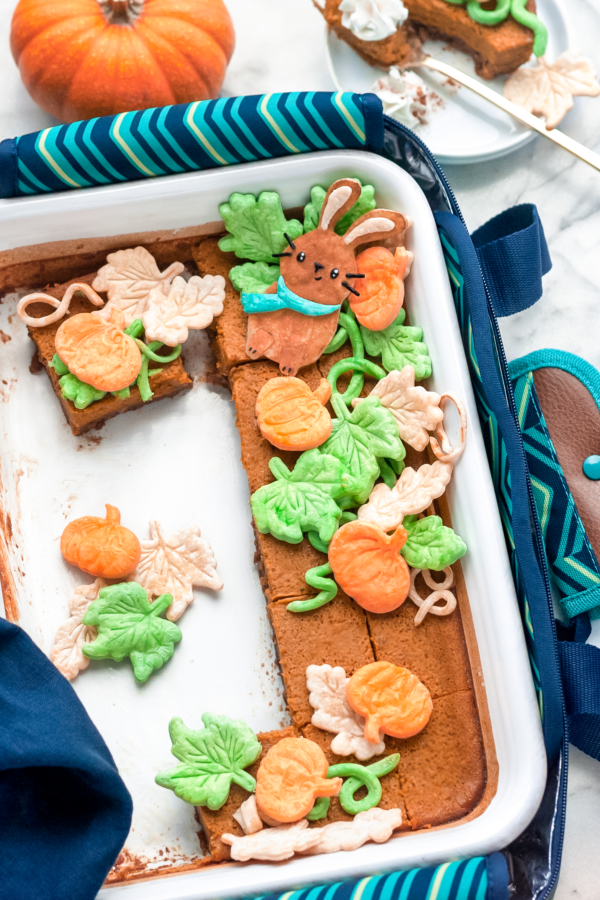
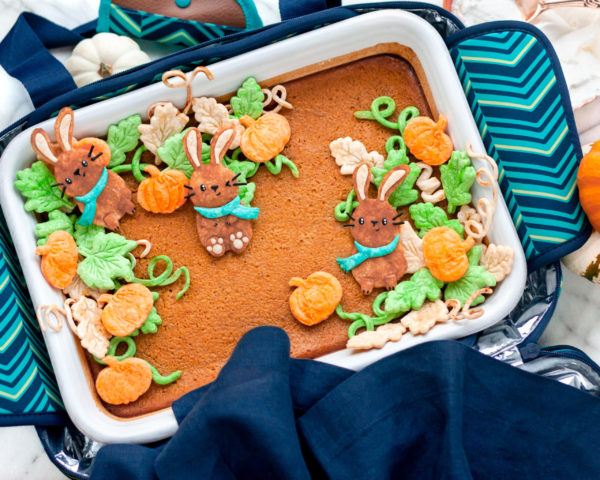
While many people love to decorate cakes, I prefer pies. There’s just something so beautifully rustic about the look of baked pie crust and it’s very easy to work with using cookie cutters and pie stamps. Feel free to customize the decorations however you’d like. I’m creating a bit of a pumpkin patch on top to mimic the flavors inside, complete with a few adorably curious bunnies (inspired by my pet bunny, Marshmallow). No matter how you decide to top your pie, I hope your Thanksgiving is full of good food, friends & family, and lots of fun!
Ingredients: (yields about 20 servings)
Gingersnap Pecan Crust:
2 cups gingersnap cookie crumbs (from about 48 cookies)
½ cup pecan pieces
½ teaspoon salt
3 tablespoons brown sugar
6 tablespoons unsalted butter, melted
9 X13 in. baking dish
Pumpkin Pie Filling:
3 cups canned pumpkin puree (not pie filling)
¾ cup granulated sugar
¾ cup brown sugar
1 ½ tablespoons all-purpose flour
2 teaspoons ground cinnamon
1 ½ teaspoons ground ginger
½ teaspoon ground nutmeg
¼ teaspoon ground cloves
Heaping 1/8 teaspoon freshly ground black pepper
¾ teaspoon salt
4 large eggs
2 cups heavy cream
Decorations:
1 package refrigerated piecrust, softened as directed on box
Green, teal, and orange gel food coloring
Leaf and pumpkin shaped pie or cookie stamps
Bunny cookie cutters (or you can use a sharp kitchen knife/X-ACTO knife to hand-cut shapes out of the dough)
1/4 cup chocolate chips (or melting wafers)
1/4 teaspoon coconut oil
Chocolate jimmy sprinkles
Egg wash:
- 1 egg, beaten (for brighter colors on the green, teal and orange dough cutouts skip the egg yolk and brush with just a beaten egg white or nothing at all)
- Turbinado sugar for sprinkling* (optional)
Helpful Tips:
Bake the crust and pie the night before serving so that it has time to cool and set, in the refrigerator, before slicing. You can bake the decorations ahead of time as well and add them to the top of the pie right before enjoying.
If you’d prefer to remove the bars and slice them before decorating, you can also line the entire baking pan with parchment paper (leaving a little overhang for easy removal).
Directions:
- Preheat the oven to 350°F. Line the bottom of a 9×13” baking pan with parchment paper. Set aside.
- To make the crust, add the gingersnap cookies, salt, and brown sugar to a food processor, and pulse until the ingredients form a course, sandy texture. Add the pecan pieces and pulse briefly, just to break them up and mix into the cookie crumbs. Transfer to a small mixing bowl, pour in the melted butter, and mix until combined. Use the bottom of a measuring cup or spoon to firmly press the crust into the bottom of the baking pan. Bake for 8-10 minutes, or until fragrant. Transfer the pan to a wire cooling rack while making the filling. (Keep the oven on)
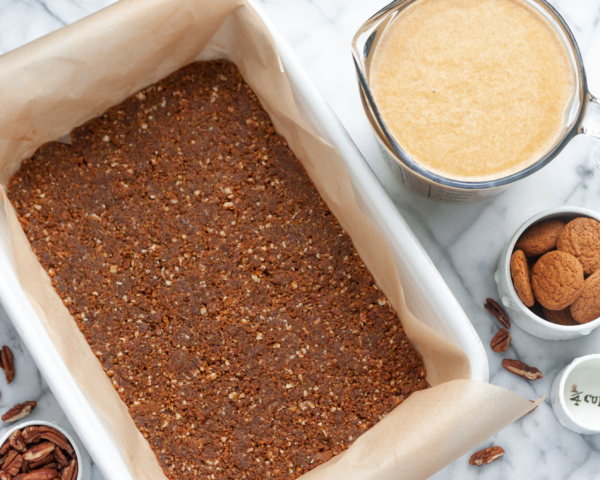
- Add all the pumpkin pie filling ingredients to a large mixing bowl and whisk until smooth and completely combined. Pour the filling over the baked crust and bake for 45-55 minutes or until the edges of the pie begin to set and the middle still has a little jiggle to it. The key is to take the pie out before it’s done as the custard will continue to cook, once removed from the oven, and overheating it will cause the filling to crack. Since each oven is different, start at 40 minutes, check the pie, and then continue, if needed. No worries if your pie does crack though! It’ll still taste delicious, and you can easily cover the cracks with pie crust decorations or whipped cream.
- Transfer the pie to a wire cooling rack to cool completely before covering and refrigerating for at least 4 hours, or overnight.
- You can leave the pie bars as is, top each with a dollop of whipped cream and/or toasted pecans or go all out with cute pie crust cutouts as I’ll show you how to do in the next few steps :).
- While the pie sets you can work on the decorations! Preheat the oven to 350°F (or leave it on). Line a baking sheet with parchment paper. Set aside.
- Roll a piece of piecrust out into a 12-inch circle and use cookie cutters or pie stamps to cutout as many leaves and pumpkins as you’d like. To color the dough, knead the food coloring gel into the dough until combined, then roll the dough out and cut out your shapes.
- To create the vines, use a pastry wheel to cut thin strips of the dough. On your prepared baking sheet, twist the strips into coils.
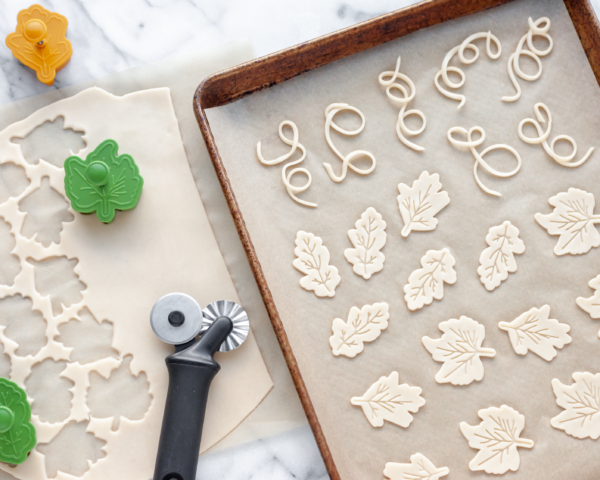
- Use either an X-ACTO or sharp kitchen knife to cut the bunny shapes out. Transfer all the shapes to your prepared baking sheet. Brush the cutouts and vines with a little egg wash. Sprinkle any of the cutouts with sugar, if using. I added a sprinkle of cinnamon to the body of the bunnies to give them more color, then overlapped them with pie dough that I didn’t brush with egg wash (for the inside of the ears and paw details) attaching with a little egg wash. I also cut scarf shapes out of the teal dough and attached those to the bunnies with eggwash.
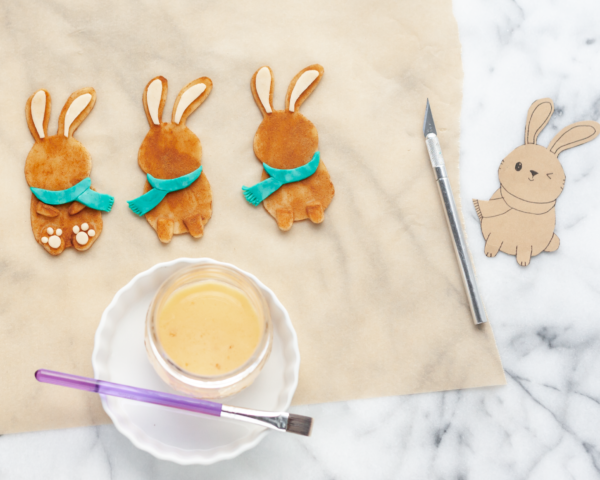
- Transfer the cutouts to the freezer for 15 minutes and then bake them for 8-10 minutes or until the dough is completely cooked through and the edges are just starting to turn golden brown. Transfer the cutouts to a wire cooling rack to cool for at least 15-30 minutes before adding any chocolate details.
- Place the chocolate chips or melting wafers into a microwave safe bowl (you can add the coconut oil if you are using chocolate chips to make them smoother), and heat in 30-second intervals at 50% power, stirring between each, until smooth and melted.
- Dip a toothpick into the melted chocolate and draw the faces and any details onto the bunny cutouts. Use the melted chocolate to attach the sprinkle whiskers as well.
- Arrange the leaves, vines, pumpkins, and bunnies around your pie, add freshly whipped cream and enjoy! To transfer to your Arctic Zone Thermal Carrier (which is how I’m carrying mine to my family’s Thanksgiving dinner) place your baking dish on the trivet, carefully cover with foil (or plastic wrap if it’s fully cooled), and place inside of the carrier (holding the sides of the trivet).
Please let me know if you try this tutorial, I would love to see your version :).


join the mailing list!
get recipes and other delicious tidbits sent to your inbox!


