Spooky Cute Mochi Ice Cream and Waffles
 *This post was created in collaboration with Sweety Ice Cream. All words, images, and opinions are my own.
Ice cream is my favorite treat no matter the time of year! It’s so refreshingly light and creamy, and it pairs perfectly with all the best holiday desserts. Plus, you know how much I like to dress it up, and there’s no better time to do that than Halloween! I’ve partnered with Sweety Ice Cream to create something extra festive and fun with their delicious Mochi Ice Cream. If you’ve never tried mochi before, it’s a sweet rice dough, and when wrapped around ice cream it makes it portable. The Sweety Mochi Ice Cream is pillowy soft and chewy on the outside with velvety smooth ice cream filling made from family recipes. I’ve taste tested almost all of them so far, and it’s really hard to choose just one, but the Vietnamese Coffee may be my top pick (I’m obsessed with all things coffee). I could really notice the quality of the ingredients used as each flavor is so fresh and bright. Sweety Mochi Ice Cream is made without artificial colors, flavors, or sweeteners. Plus, at less than 100 calories each, it’s hard to say no to this sweet bite after dinner :).
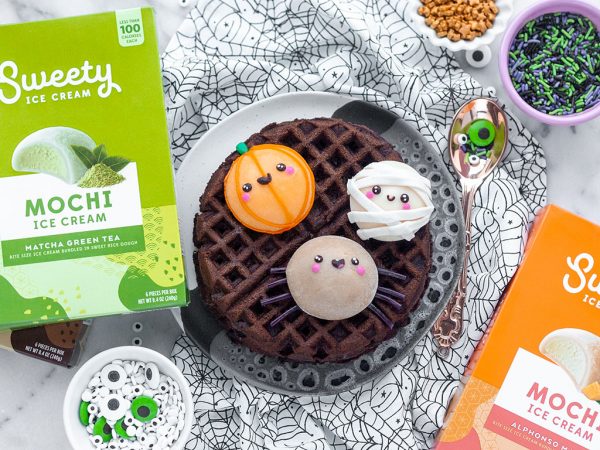
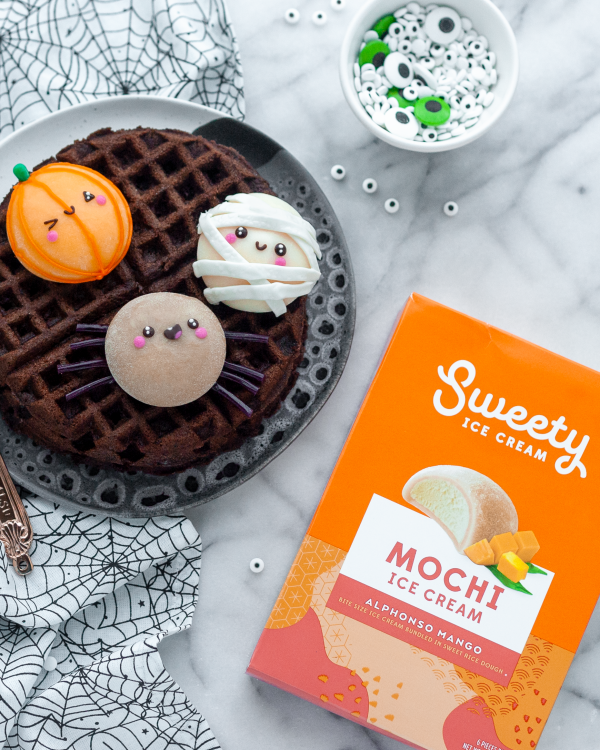
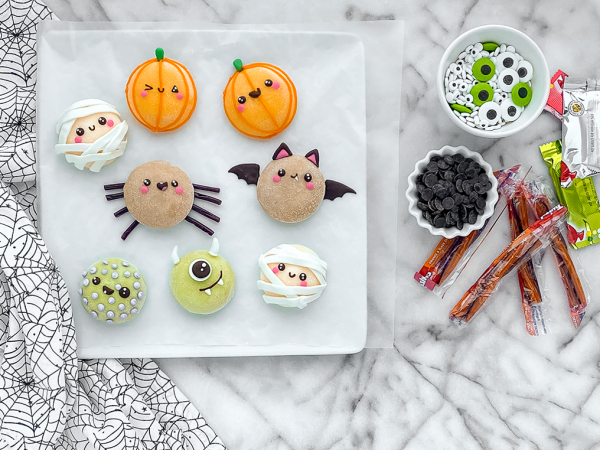
While the Mochi Ice Cream is fantastic on it’s own, I thought I’d kick it up a notch with a dessert that’s a cross between brownie sundaes and a waffle cone. These crisp and fluffy waffles are easily made using brownie mix, and then I turned the Mochi Ice Cream into spooky cute Halloween characters with a little candy and frosting. Feel free to use my characters as an example or create your own! The plump, round shape of the Mochi Ice Cream makes it so easy to decorate as most anything with what you already have in your kitchen (and your Halloween candy stash). This diy is fun for kids of all ages with adult supervision for the waffles and any cutting.
As a bonus treat, head on over to my Instagram to find out how you can enter for a chance to win your own set of Sweety Mochi Ice Cream, and a fun decorating kit full of sprinkles, frosting and more!

Ingredients: (makes 8 waffles using 1/2 cup batter each)
Brownie Waffles
1 18.4oz box of your favorite brownie mix
1/4 cup vegetable oil
1/4 cup water
4 large eggs
Non-stick Cooking Spray
Waffle Press
Halloween Character Decorations:
Toothpicks
Wax paper
Kitchen scissors
White chocolate chips
Milk or dark chocolate chips/buttons (I find the flat chocolate chips at Trader Joes’s. They are unsweetened cacao chips)
Pink candy melts or round sprinkles
Mummy:
Madagascar Vanilla Mochi Ice Cream
White frosting
Piping bag or small zip top bag (cut a small corner off so the frosting can pipe flat, like ribbon)
#47 piping tip and coupler (if using piping bag)
Jack O’ Lantern:
Alphonso Mango Mochi Ice Cream
Green taffy candy
Orange decorating icing
Small round piping tip and coupler ring
Spider:
Vietnamese Coffee or Classic Chocolate Mochi Ice Cream
Black licorice ropes or pull n’ peel licorice strands
Monsters:
Matcha Green Tea Mochi Ice Cream
Sprinkle eyeballs
White icing
Purple icing gel coloring
Piping bag
Small round piping tip & coupler

Helpful Tips:
Allow the waffle press to fully heat up before using. You should only have to spray the waffle press once before starting your waffles, but if you are still having trouble with them sticking spray a little non-stick spray onto a paper towel and carefully brush over the waffle press plates before cooking each waffle (be very careful not to touch the plates with your fingers as they are hot). You may have to experiment with the setting on your waffle press – I used setting 4 to get mine nice and crisp so they held together. Heatproof kitchen tongs are an easy way to remove the cooked waffles in 1 piece. Follow the suggested waffle batter amount for your waffle press.
Keep the Mochi Ice Cream in the freezer, and decorate just before serving/eating. A toothpick helps to transfer the chocolate details to each mochi character.
*Adults should help with all cutting, and cooking over hot surfaces.
Directions:
- Plug in your waffle press to preheat to your desired setting (I used 4).
- Transfer all of the waffle ingredients to a mixing bowl and whisk together until smooth and completely combined.
- Lightly coat your prepared waffle press with non-stick cooking spray, and add the amount of batter suggested in your owner’s manual (I used 1/2 cup). Close and cook until finished.
- Carefully remove your waffle and stack on a plate while you finish cooking all of the waffles. Set aside.
- Reheat the waffles at 300 degrees F for 10 minutes just before serving or feel free to enjoy at room temp.
- Time to make the cute mochi characters! Place your Sweety Mochi Ice Cream flavors onto a large plate lined with wax paper. You will want to keep them in the freezer and work with 1 at a time so they don’t get too soft before you can serve them.
- For each character, I melted chocolate chips to make the faces. To do this, place your chocolate chips into a heatproof bowl, and microwave in 30-second intervals, stirring after each, until smooth.
- Use a toothpick dipped into the melted chocolate to draw your designs onto wax paper. The eyes can easily be added with just the chocolate chips or buttons. If you’d like to add highlights, like on my character’s eyes, dot a little melted white chocolate onto each eye with a toothpick. Allow to set.
- To create the cheeks, repeat the same melting process as above, with the pink chocolate, and then make small circles on top of your wax paper. Or just add small round pink sprinkles.
- The mummy’s wrap is created by piping ribbons of the white frosting around the Madagascar Vanilla Mochi Ice Cream. Add the face first to help guide where to pipe, and overlap your lines to make it really look “wrapped up”.
- The Jack O’ Lanterns are made by piping 5 lines around the mango mochi with the decorating icing. Pipe 1 line down the center, then 2 on each side following the curves of the mochi. Heat an unwrapped green taffy for 5 seconds (on a heatproof plate) in the microwave. This makes it pliable so you can mold a few tiny pieces into stems.
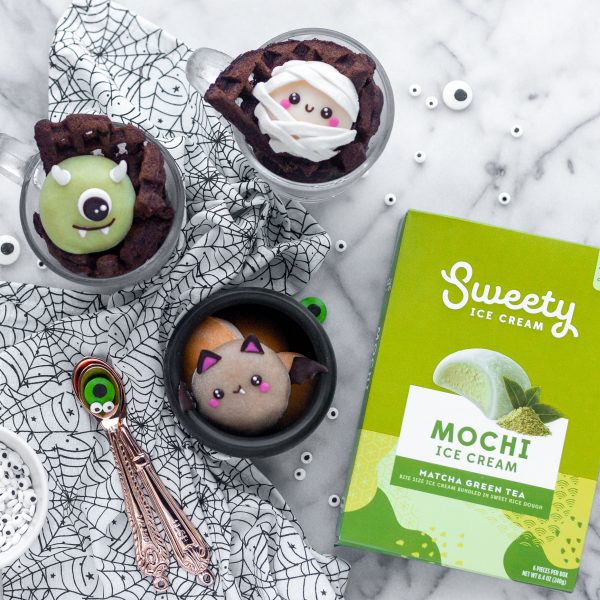
- The bat was created with wings made the same way as the chocolate pieces above. You could add taffy wings instead. Just tuck the wings below the bat mochi when you place it on top of the waffles.
- The monsters were decorated with purple icing piped into dots and white taffy formed into horns. You can use a little melted chocolate to get any pieces to stick.
- Put together the spider when you are ready to serve the waffles. Place 4 strands of licorice on top of the waffles, then add your spider mochi on top.
- Go wild and decorate the Sweety Mochi Ice Cream however you would like! I promise that it’ll be delicious no matter how you make it look :). Enjoy!

To serve smaller portions, divide each waffle into 4 section and place inside a mug. Top with your spooktacular mochi characters. Leftover waffles can be stored in the freezer along with the Mochi Ice Cream.
You can find Simply Strawberry, Vietnamese Coffee, Alphonso Mango, Matcha Green Tea, and Classic Chocolate Sweety Mochi Ice Cream at Walmart. Click here for a full list of local retailers, and don’t forget to check out the giveaway for a chance to win your own set!!
Please let me know if you try this tutorial, I would love to see your Mochi Ice Cream characters 🙂
join the mailing list!
get recipes and other delicious tidbits sent to your inbox!