


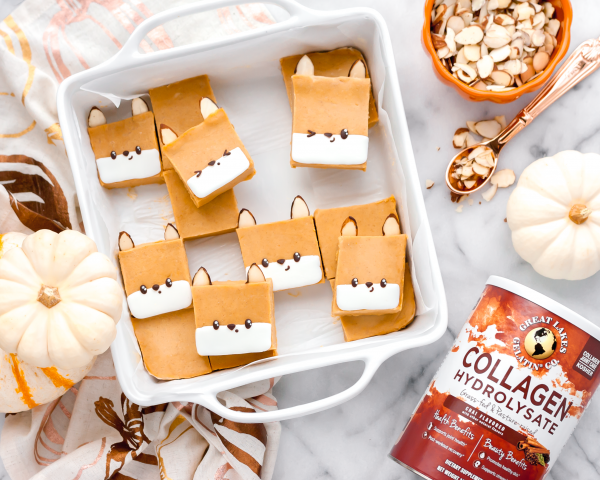
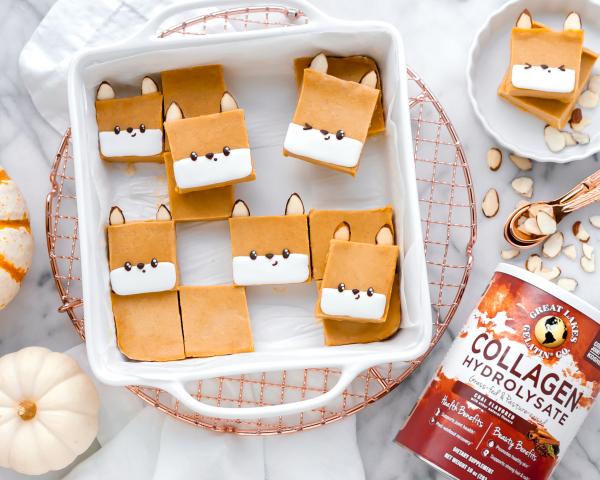
Chai Pumpkin Fox Fudge
*This post was created in collaboration with Great Lakes Gelatin. All words, images, and opinions are my own.
Now that autumn has officially arrived, it’s time to bring on all the cozy/spicy flavors, and of course everyone’s fave – pumpkin! I teamed up with my friends at Great Lakes Gelatin to create a deliciously decadent (and crazy easy) fall fudge using their brand new Chai Collagen Hydrolysate. This Chai Pumpkin Fudge is gluten, dairy and refined sugar free- only sweetened with the Stevia and Monk fruit that’s in the collagen powder. The chai spices pair so perfectly with the creamy pumpkin to give it an almost pie like taste, and this is one “pie” that you won’t feel guilty about having a second slice :).
Collagen powder is one of my daily musts for amino acids, joint health, and reduced recovery time after workouts (especially nice after a long run). Aside from this fudge, the Chai Collagen would be delicious in coffee, tea, and really any dessert that could use a kick of spice (and the added nutrition).
Ingredients: (makes 16 servings)
Chai Pumpkin Fudge:
1/2 cup coconut oil
1/4 cup Great Lakes Gelatin Chai Collagen Hydrolysate
1 1/2 cups cashew or nut butter (I used 1 cup cashew, and 1/2 cup peanut butter for a nuttier flavor, but almond butter would be delicious as well)
1 cup pumpkin puree (not pumpkin pie filling)
1 TB vanilla extract
1 tsp cinnamon
1/8 teaspoon salt
9×9 inch baking pan
Parchment paper
Fox Decorations: (template avail. upon request)
Almond slices
2 TB dark chocolate chips
1/4 cup stevia-sweetened white chocolate, or dairy-free option
1/2 tsp coconut oil (optional, to smooth the chocolate)
Toothpicks
Wax paper
Directions:
- Line a 9×9 inch pan with parchment paper. Set aside.
- Transfer the coconut oil to a heatproof bowl, and microwave in 30 second intervals until completely melted.
- Whisk in the collagen powder until dissolved.
- Stir in all of the other fudge ingredients, and mix until smooth and completely combined. Pour the fudge into your prepared baking pan and smooth the top with a spatula.
- Transfer the fudge to the freezer to set ( it should take about 2 hours).
- While the fudge sets, we can work on the fox decorations. Heat the white chocolate and 1/4 tsp coconut oil in a small heatproof bowl, for 30 seconds at 50% power. Stir, and continue to heat in 30 second intervals until completely smooth and melted.
- Use a toothpick dipped into the chocolate to draw a 1×2 inch rectangle for each fox onto wax paper. Allow to set. *if you’d prefer, you can also dip the bottom 1/3 of each square of fudge into the white chocolate once it’s fully chilled.
- Melt the dark chocolate chips just as you did with the white chocolate (using the other 1/4 tsp coconut oil).
- Use a toothpick dipped into the chocolate to draw the fox’s eyes, nose and mouth onto wax paper. Allow to set.
- When you are ready to eat the fudge, use a sharp knife to cut it into 16 even squares. Transfer the chocolate details to each square (you can use a toothpick to help with this). Serve immediately, return any leftovers to the freezer.
The fudge can be eaten right from the freezer (or fridge if you prefer it a tad softer). Just allow the freezer fudge to soften for about 3-5 minutes at room temperature before enjoying. If you’d like to skip the foxes, you can also leave the fudge as is or top it with toasted pecan pieces. Also, feel free to cut the squares even smaller if you’d like them to be bite-sized.
Please let me know if you try this tutorial, I would love to see your version :).


join the mailing list!
get recipes and other delicious tidbits sent to your inbox!


