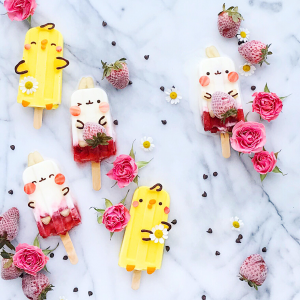
Molang and Piu Piu Vegan Ice Cream Pops

Popsicles always bring me back to my childhood when I used to sneak them out of the freezer on sweltering summer days. I think I could eat 5 or more in a day back then :). Now I still love them, but enjoy making my own so that I can make them a bit healthier with fresh fruits and less sugar. Sometimes I even like to let one melt into a glass of sparkling water for an extra bit of flavor.
Winter may still be hanging around, but I can’t wait for spring, and thoughts of warmer weather have me craving light and fresh flavors and all the frozen treats lately! No bunny loves strawberries as much as the adorable Molang, so for National Strawberry Day I made him into strawberry and cream pops by layering vanilla coconut yogurt with an easy and quick strawberry granita, and fresh berries. Molang’s best friend, Piu Piu, is a delicious, creamy coconut mango flavor. Both recipes are dairy and refined sugar free. I enhanced the sweetness of the fruit with just a touch of stevia and organic coconut sugar, but you can feel free to use a little honey or maple syrup if you prefer.
Ingredients: (each flavor recipe makes 5 popsicles, 10 total)
10 cavity popsicle mold with sticks*
*soak the sticks in a bowl of warm water for about an hour prior to using them to keep them from floating up while setting into each popsicle
Strawberries and Cream:
Vanilla Coconut Yogurt:
8 oz plain or vanilla unsweetened coconut yogurt (Greek yogurt also works well, it just won’t be dairy free)
1 teaspoon vanilla extract
7-10 drops pure stevia extract
Pinch of sea salt
Strawberry Granita: (made with frozen whole strawberries instead of fresh fruit and water to save time)
6 whole frozen strawberries
1-2 teaspoons organic coconut sugar
5 fresh strawberries chopped into small pieces
Creamy Coconut Mango:
1 cup coconut milk, full fat
2 cups frozen mango
7-9 drops pure stevia extract
1/2 teaspoon pure vanilla extract
Pinch of sea salt
Decorations:
1 small/medium white pear
1 orange
2-3 large strawberries
1 medium mango
1/4 cup dark chocolate chips
Toothpicks
Wax paper
Directions:
- To make the strawberries and cream popsicles add all of the vanilla coconut yogurt ingredients to your blender and blend until smooth and creamy. Pour into 5 popsicles molds filling each about 3/4 full. Place in the freezer while making the other layers.
- Rinse out the blender, and add the frozen strawberries and coconut sugar. Blend until it reaches an icy, slushie-like consistency. Chop the fresh strawberries into small pieces. Spoon the granita on top and then add a sprinkling of the fresh berries to each popsicle mold.
- To make the creamy coconut mango popsicles add all of the ingredients to your blender and blend until smooth. Pour the mixture into the other 5 popsicle molds (I like to transfer it to a measuring cup to make it easier to pour).
- Place the lid on your popsicle mold, if your mold has one, and add the sticks. Freeze for at least 4 hours or overnight before enjoying.
- You can prepare some of the decorations while the popsicles set! Begin by melting the chocolate either over a double boiler, or in the microwave in 30 second intervals at 50 % power, stirring in between each interval until fully melted.
- Use a toothpick to “draw” all of your designs onto the wax paper. You can make any expressions you like – I always like sleepy eyes and winks. Molang’s mouth is like a “W” with the middle line longer than the sides. You can draw the outlines for Piu Piu’s feathers and wings, and Molang’s paws as well if you would like (or you can just cut them out of the fruit).
- To make Piu Piu’s features, use 2 round piping tips (one slightly larger than the other) to cut the beak pieces out of the orange peel. You can use the larger piping tip to also cut out the feet (just use a knife to divide each circle for the 2 feet). Use a sharp knife to cut the wing shapes and the feathers for the top of Piu Piu’s head out of the mango.
- To make Molang’s features, cut the ears and paws out of pear using a sharp knife. Molang’s ears are v tiny compared to his body, and you can even cut them both as one piece with little triangles cut out of the top and bottom to give them more shape (see mine in the image above).
- When you are ready to put them all together, turn your popsicle mold upside down and run warm/hot water over it until the popsicles release. I like to place them onto a baking sheet lined with wax paper while I decorate for easy clean up, and to move to the freezer if any get too melty. You can put the whole tray in the freezer and work with just 1 pop at a time if you don’t want to rush. Once they are all decorated you can eat them right away, or keep in the freezer until you are ready.
join the mailing list!
get recipes and other delicious tidbits sent to your inbox!