


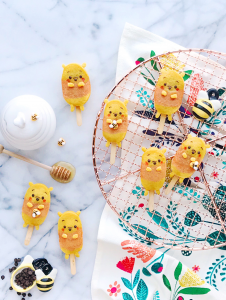
Ufufy Pooh Bear Vanilla “Hunny” Cakesicles
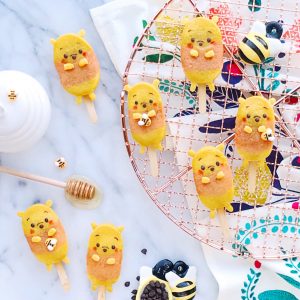
**This recipe was created in collaboration with Disney Family*** Three cheers for Pooh! I’ve always had a soft spot for that chubby little cubby all stuffed with fluff. When I was little I used to spend my weekend mornings watching Pooh Bear go on adventures with his friends in the hundred acre wood, and even now, his sweet and silly words come in handy when I’m looking for just the right thing to say. I can’t help but collect all the adorable plush versions of my most loved Disney character! The soft, squeezable Ufufys might just be my favorite of all, so in honor of Winnie the Pooh Day I baked Ufufy Pooh Bear Cake Popsicles (you can’t have a celebration without cake), and I sweetened them with Pooh’s favorite treat. These Vanilla Hunny Cake Popsicles are beary simple to put together, and they are so light and fluffy you will want to both hug them and eat them :). You can check out more fun Disney Family food here
Ingredients: (makes 12 cake popsicles)
Vanilla Hunny Cake:
1 1/4 cups all purpose flour
1/4 teaspoon salt
1 teaspoon baking powder
1/4 teaspoon baking soda
1/2 cup unsalted butter, softened
1/2 cup honey (I used raw honey)
1 1/2 teaspoons pure vanilla extract
2 large eggs
1/3 cup whole milk
Golden yellow gel food coloring
Red gel food coloring
Nonstick baking spray
Silicone popsicle baking mold with sticks (the mold should already come with wooden popsicle sticks)
Piping bag or small zip top bag
Ufufy Pooh Bear Decorations:
Small Kitchen Knife
Small round piping tip or heart cookie cutter
1/4 cup dark chocolate chips
1/4 cup yellow candy melts
Toothpicks
Pink food marker
*All cutting should be done by an adult.
Directions:
- Preheat the oven to 325° Spray the silicone mold generously with baking spray and place on a baking sheet. Set aside.
- In a medium sized mixing bowl, whisk together the flour, salt, baking powder, and baking soda.
- Place the butter in the bowl of an electric mixer, and beat on medium for 2 minutes until the butter becomes light and fluffy.
- One at a time, add the honey, eggs and vanilla, beating for about 1 minute on medium in between each addition. Scrape down the sides of the bowl with a spatula, and beat all of the ingredients until fully combined (about 3 min).
- Alternate between adding the flour mixture and the milk, a little at a time, using a spatula to scrape down the sides of the bowl as needed, until all ingredients are just combined. Do not over mix. It is ok for the batter to be slightly lumpy at this stage because you will be mixing it further by hand when adding the colors.
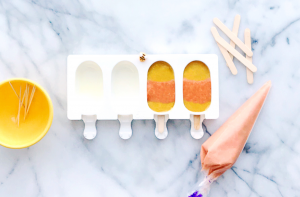
- Place ¼ of the batter in a small bowl and add a tiny amount of the red gel coloring. Stir until the coloring is completely incorporated into the batter. Transfer to a piping or zip top bag.
- Add a little golden yellow gel coloring to the rest of the batter and stir to completely combine.
- Use the golden yellow batter to fill each popsicle mold a little over 1/3 full (you can scoop the batter into the mold with a spoon).
- Add a popsicle stick to all but 1 mold, and cover it as needed with more batter.
- Cut a small corner off of your piping or zip top bag, and use the red batter to add Pooh Bear’s shirt to all but 1 popsicle (you will want to leave 1 cavity all yellow in each batch that you bake for the hands, legs, and ears). You can use a toothpick to draw the shape in the yellow batter before piping as a guide.
- Bake the cake popsicles for 12-15 minutes, or until a toothpick inserted in the center comes out clean.
- Allow the cake to cool in the mold for 10 minutes before carefully removing and transferring to a cooling rack to cool completely.
- Once the cake is cool, you can use the extra yellow pieces to cut out the hands, ears, and legs. A small round piping tip helps to cut the shapes out or you can use the top of a small heart cookie cutter (and then just use the knife to trim in the sides and flatten the bottom). You will need 6 pieces per cake popsicle (the ears and hands are about the same size, and the legs are a little longer).
- Melt the yellow candy melts in a microwave-safe bowl in 30 second intervals at 50% power, stirring in between each set, until the melts are smooth.
- Use a toothpick to add a little of the melts to each piece, and then attach them to your cake popsicles.
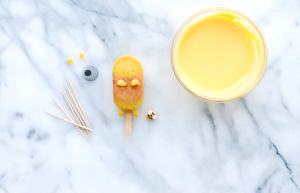
- Melt the chocolate chips in the same way that you did the candy melts, and use a toothpick to draw Pooh’s facial features onto the cake.
- Add the blushing cheeks by gently dabbing the cake with the pink food marker and enjoy!


join the mailing list!
get recipes and other delicious tidbits sent to your inbox!


