


My Little Pony Confetti Cake Popsicles and GIVEAWAY
*This post is sponsored by TownleyGirl. All words, images, and opinions are my own.
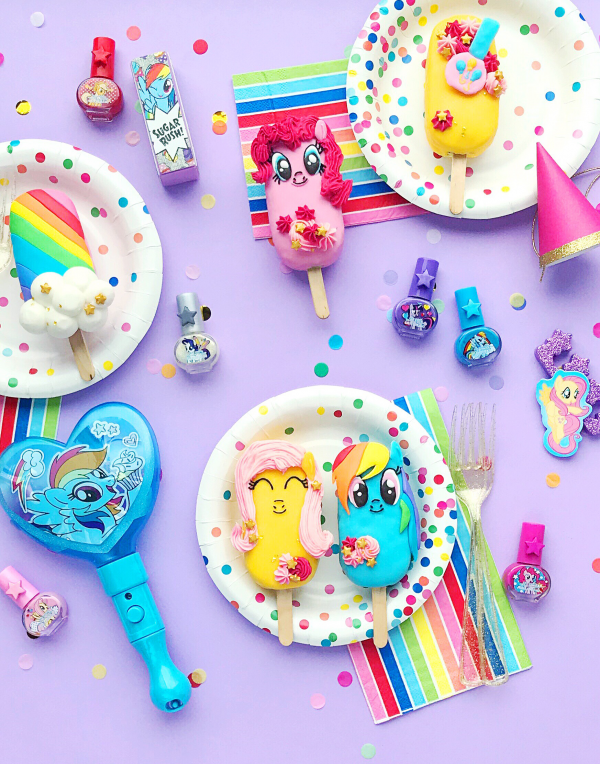
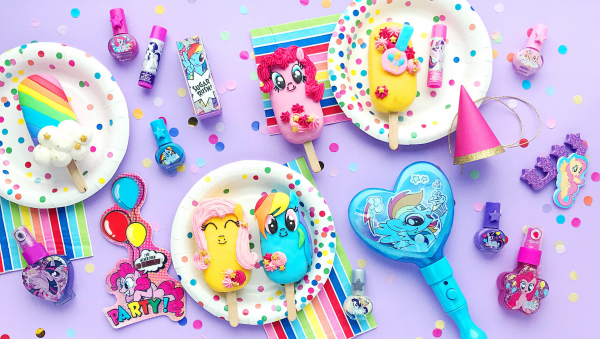
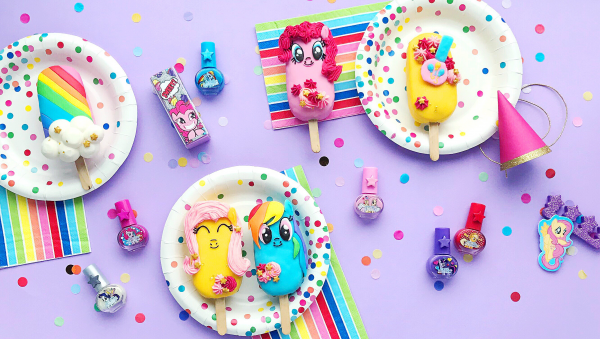
Growing up, there was nothing I loved more than rainbows, sparkles, and playing dress up (although I don’t think my mom enjoyed it as much when I was using her makeup lol), so I was definitely a huge My Little Pony fan :). I especially loved Rainbow Dash with her colorful mane and sassy yet strong personality. There is something truly wonderful about revisiting the things you loved as a child, and so I am super excited to share a pretty and cute collaboration I did with TownleyGirl! TownleyGirl partners with amazing brands like Disney and DreamWorks to create fun, nontoxic, kid- friendly cosmetics and accessories (the nail polishes even peel off for easy cleanup). They come perfectly packaged for gifts and party favors with tons of cute characters options. I wish I’d had makeup this awesome when I was little!
I thought it would be fun to throw a My Little Pony party complete with cake and prizes. To find out more about the giveaway and to enter please see instructions below.
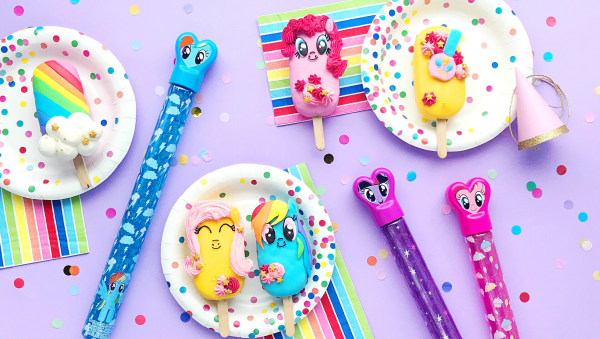
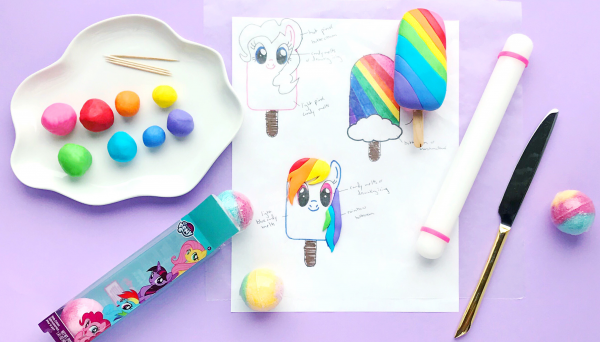
These confetti cake popsicles are a piece of cake as they begin with cake mix, and you can bake them right in the mold (bypassing the step of mixing the cake with the frosting as you usually do with a cake pop). I’ve even included a template, made from my sketches, so that you can easily replicate the eyes and other decorations.
Giveaway:
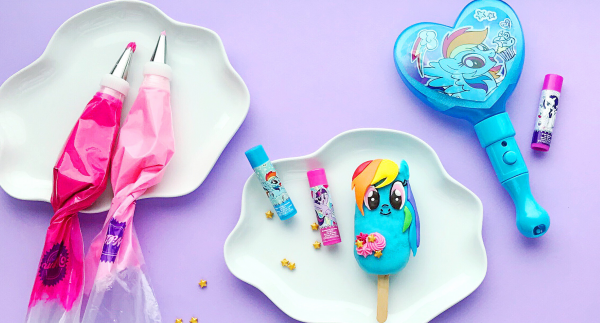
Giveaway closed, the winner is…@miller.roxy !!! This giveaway is open to all residents of the USA. To enter, please make sure you are following @luxeandthelady and @townleygirl on Instagram, and then comment with your favorite My Little Pony character below, that’s it! The giveaway ends Monday, August 27 at 11:59pm EST, and the winner will be announced Tuesday morning both here (on this post) and on Instagram. Prizes include all TownleyGirl cosmetics and accessories shown in these photos as well as others you can check out in my Instagram stories (cake pops not included)!
Ingredients: (makes 20 cake popsicles)
This post contains affiliate links to some of the products mentioned. Luxe and the Lady is a participant in the Amazon Services LLC Associates Program, an affiliate advertising program designed to provide a means for sites to earn fees by linking to amazon.com . This helps to pay for the ingredients used to make even more cute, smiling treats :), and doesn’t cost you extra to use.
Confetti Cake Pops:
Nonstick baking spray
Popsicle shaped silicone molds
Piping bag or large zip top bag
20 popsicle sticks (these come with the popsicle baking molds)
1 15.25 oz. box vanilla cake mix with pudding in the mix
1 cup whole milk
4 large eggs
1 cup rainbow jimmies or any rainbow sprinkle mix you prefer
My Little Pony Decorations:
Bright Pink, Bright White, Yellow, and Blue Candy Melts
¼ cup chocolate chips
*Paramount crystals or vegetable oil (optional, to make the melts smooth)
Black decorating icing
16 oz. white icing (I used one that is a medium consistency)
4 oz. bright white fondant
Pink, red, orange, yellow, green, blue, and purple icing gels
Piping tips #1, 21, 1A & 18 (I used Wilton brand)
Couplers to fit the piping tips
3 piping bags
*Rainbow or star sprinkles (optional)
Wax paper
Toothpicks
**All cutting should be done by an adult.
Directions:
- Preheat your oven to 350°F Generously coat your silicone popsicle molds with nonstick baking spray, and place them on a baking sheet lined with parchment paper.
- Add the cake mix, eggs, whole milk, and sprinkles to a medium sized mixing bowl, and whisk for 2 minutes. Transfer the batter to either a large zip top bag or a piping bag (I like to use a wide mouth glass or jar to hold the bag while filling it with batter). Cut a corner off the bag, and pipe the batter into each popsicle cavity filling half full.
- Insert a popsicle stick into each, and bake for 12-15 minutes or until a toothpick inserted into the center comes out clean. Allow the cake popsicles to cool for at least 15 minutes before gently removing from the molds and transferring to a cooling rack to cool completely.
- While you are waiting for the cake pops to cool you can prep to dip them. Place yellow, blue, and bright pink (with a handful of bright white) candy melts into each of three tall glass jars. This makes it easy to coat all the sides and catches the drip off without as much mess. Heat each jar, in the microwave, for 1 minute at 50% power, then stir. Continue to heat each jar for 30 seconds at 50% power, stirring between each set, until fully melted. If you notice any lumps you can stir in a little vegetable oil or paramount crystals until the candy melts are thinned enough.
- Dip the cooled cake popsicles into the different colors of candy melts allowing the excess to drip back into the jar. If you notice any air bubbles you can either gently tap the back of the cake pop against the top of the jar, or use a toothpick to pop them.
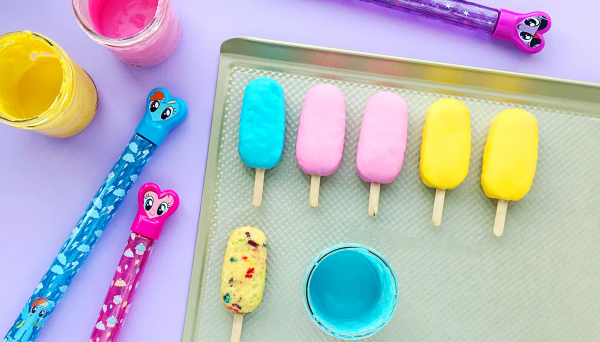
- Place the dipped pops onto a piece of wax paper to set. I like to dip each twice for an even and smooth coating (wait about 10 min. in between coats to allow the first one to set).
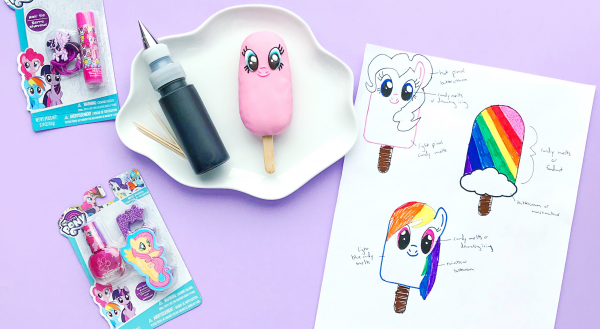
- Now it’s time to make the ears, eyes for Pinkie Pie and Rainbow Dash, and the teeny nail polish bottle with Pinkie Pie’s cutie mark. In 2 small bowls, melt a little of the bright white melts and chocolate chips separately, as you did for the other candy melt colors. Using the My Little Pony template underneath wax paper as a guide (you can resize it before printing if needed), dip a toothpick into the appropriate colors, and draw onto the wax paper to create the eyes. Repeat this process to make the nail polish bottle (waiting for the base colors to set before adding the balloon design). Allow all of the designs to set.
- Separate the white frosting into 3 small bowls. Leave one as is, and in the second bowl add just a tiny bit of pink to create a light pink shade for Fluttershy’s hair. Add more pink and a tiny bit of purple to the third bowl to make the fuchsia shade for Pinkie Pie’s hair. Fit a piping bag with the 1A piping tip, and the other 2 bags with either a #18 or #21 piping tip. Add the white frosting to the bag with the 1A tip, and the pink shades to the other 2 bags. Set aside.
- Separate the fondant into 7 1-inch balls and add pink, red, orange, yellow, green, blue, and purple food coloring to each. Mix a little of the blue and purple fondant pieces together to create indigo. Use the template under a piece of wax paper as a guide to create the rainbow pop design, and hair for Rainbow Dash (use a butter knife to trim and smooth the edges, and either a fondant or lightweight rolling pin to smooth).
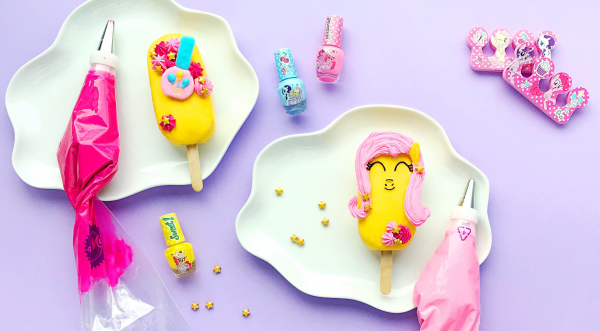
- Now it’s time to turn the cake pops into cute ponies!! Start by using a little more melted candy melts to attach the eyes, and then pipe the lashes and noses with the black decorating icing fitted with the #1 piping tip. Next, use the buttercream to add the hair, and press the ears into the icing to hold. The fondant designs should stick directly to the dipped cake pops, but you can use a little water or frosting if you need help attaching them. Use the white frosting to pipe round dots to create the clouds on the rainbow pop (smooth any frosting points with a finger dipped in a little water if needed). I also used the pink frosting to created little rosettes just by pressing and releasing, or swirling the frosting. Then I finished the designs with a sprinkling of gold stars, but feel free to add any sprinkles you like. Your cake pops are ready to party!! Enjoy them right away, or store in an airtight container in the refrigerator to eat later. The frosting colors will fade with prolonged exposure to sunlight, so it’s best to keep them covered if you aren’t eating them soon.

Feel free to play around with the flavor of the cake mix that you use (strawberry would give the cake a pretty pink hue). For even more kid’s party ideas check out the TownleyGirl blog (they have some themes that would be great for the holidays). You can find the entire TownleyGirl My Little Pony collection here.

Leave a Reply


join the mailing list!
get recipes and other delicious tidbits sent to your inbox!


So cute! Of course Rainbow Dash is our favorite favorite!
Princess Celestia
My daughter loves twilight sparkle!
So adorable n Pinkie Pie 😍😍💖😍💕😏
Favorite is Rainbow Dash
Pinkie Pie!!! My daughter would go crazy for this party!
Love this! My daughter loves Pinkie Pie!
I love it!! What a fun, easy recipe!! Im definitely saving it and pinning for later. My six year old is obsessed and i do mean OBSESSED with MLP so she’s going to love making these.
I think if i had to choose, Fluttershy is my favorite of them, she is always so calm and happy!
Also, your pictures are beautiful!! I love the colors and everything just looks amazing!!
Rarity is our favorite!! We are following both accts. on IG: @xbug62 – These are super adorable! Love them! So fun!
My favorite character is Rainbow Dash, but my daughter says hers it Twilight Sparkle and my son (lol) says Pinkie Pie.
Apple Jack!
Such a cute one! Also, you are the winner of my giveaway!!! Congratulations, I’ll email you shortly for shipping information. Thank you for entering 🙂
rainbow dash
Rainbow dash
Apple Jack and Twilight Sparkle are my kids faves
Lyn daughter loves rainbow dash!!
AppleJack pony
my daughter loves fluttershy for some reason! xoxo
thanks!
instagram name- vanitizebaby
Fluttershy is so cute!!I love the pink and yellow color combination :). Thank you for entering!